Introduction
The accuracy of IR temperatur measurement is dependent on the emissivity of the surface that is to be measured on. Here we describe two methods to enhance the accuracy of the measurement.
Method 1
Calibrate against known values
This method requires the ability to measure and adjust the target surface temperature at two different values.
Step 1:
Go to Edit sensor and open the advanced settings – Digitizer config and delete settings (Do not set to zero! Delete all numbers).
Step 2:
Set the target surface to low temperature and measure the temperature by calibrated instrument. In this example we have a surface that is 150°C, measured with a calibrated instrument.
The Neuron IR 380 sensor displayed a value of 138°C.
Step 3:
Set the target surface high temperature and measure the temperature by calibrated instrument. In this example we have a surface that is 200°C, measured with a calibrated instrument.
The Neuron IR 380 sensor displayed a value of 184°C.
Step 4:
Insert the values from step 2 and 3 into the advanced settings – Digitizer config.
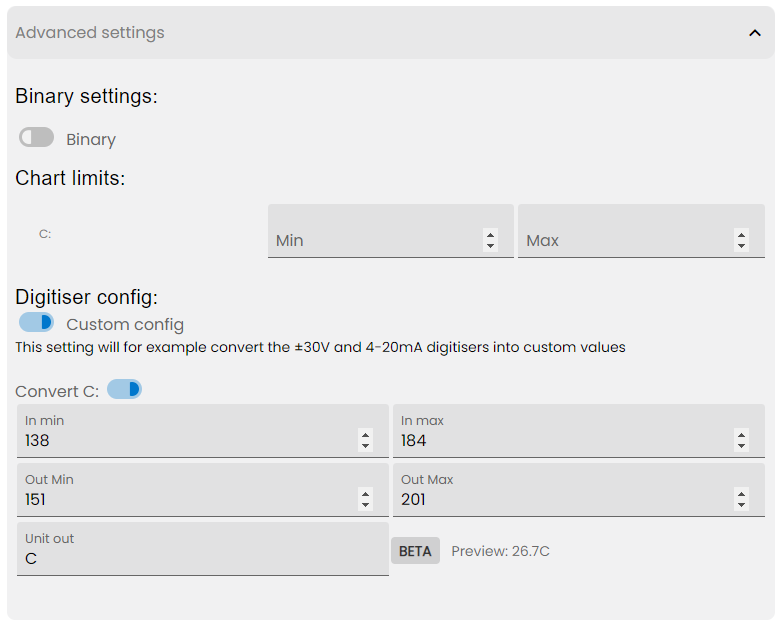
When all values are inserted, you will have a preview of the calibrated temperature.
Press Save and return to home, wait for new sample to verify your calibration.
Method 2
Adjustment for emissivity
If you cannot calibrate against known instruments but know the emissivity of your target surface the following procedure can be used to make the sensor give more accurate readings.
Step 1:
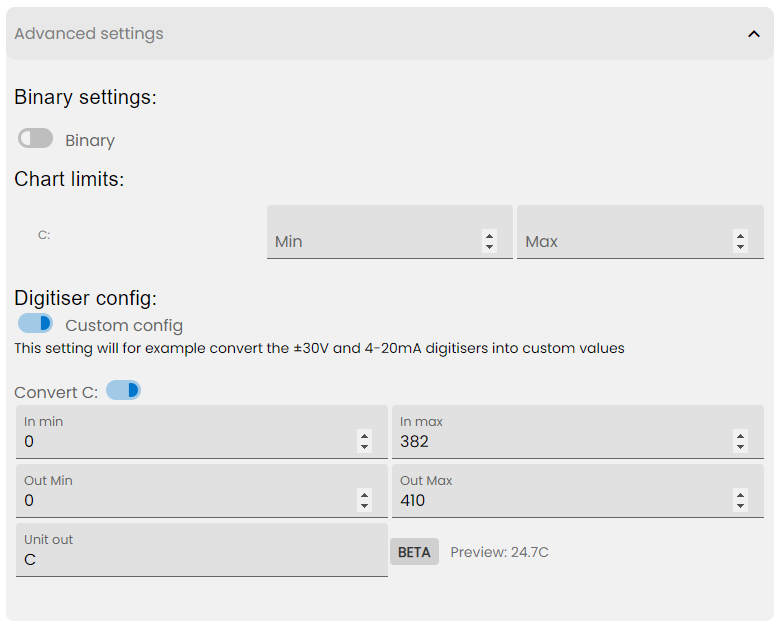
Open the advanced settings – Digitizer config.
Step 2:
Look at emissivity table and find the corresponding Out max value for your surface.
Insert these values:
In min = 0 In max = 382.
Out max = 0 Out max = From table below.
| Emissivity | Out max | Emissivity | Out max | Emissivity | Out max |
|---|---|---|---|---|---|
| 1 | 382 | 0.74 | 467 | 0.48 | 627 |
| 0.99 | 385 | 0.73 | 471 | 0.47 | 637 |
| 0.98 | 387 | 0.72 | 475 | 0.46 | 646 |
| 0.97 | 390 | 0.71 | 480 | 0.45 | 656 |
| 0.96 | 392 | 0.7 | 484 | 0.44 | 667 |
| 0.95 | 395 | 0.69 | 489 | 0.43 | 678 |
| 0.94 | 398 | 0.68 | 494.0 | 0.42 | 689 |
| 0.93 | 401 | 0.67 | 499.0 | 0.41 | 701 |
| 0.92 | 404 | 0.66 | 504.0 | 0.4 | 713 |
| 0.91 | 407 | 0.65 | 509.0 | 0.39 | 726 |
| 0.9 | 410 | 0.64 | 515.0 | 0.38 | 740 |
| 0.89 | 413 | 0.63 | 520 | 0.37 | 754 |
| 0.88 | 416 | 0.62 | 526.0 | 0.36 | 769 |
| 0.87 | 419 | 0.61 | 532.0 | 0.35 | 785 |
| 0.86 | 422 | 0.6 | 538.0 | 0.34 | 801 |
| 0.85 | 425 | 0.59 | 544.0 | 0.33 | 819 |
| 0.84 | 429 | 0.58 | 550.0 | 0.32 | 837 |
| 0.83 | 432 | 0.57 | 557.0 | 0.31 | 857 |
| 0.82 | 436 | 0.56 | 564.0 | 0.3 | 878 |
| 0.81 | 439 | 0.55 | 571.0 | 0.29 | 900 |
| 0.8 | 443 | 0.54 | 578.0 | 0.28 | 924 |
| 0.79 | 447 | 0.53 | 586.0 | 0.27 | 949 |
| 0.78 | 450 | 0.52 | 593.0 | 0.26 | 976 |
| 0.77 | 454 | 0.51 | 601 | 0.25 | 1005 |
| 0.76 | 458 | 0.5 | 610 | ||
| 0.75 | 462 | 0.49 | 618 |
When all values are inserted, you will have a preview of the calibrated temperature.
Press Save and return to home, wait for new sample to verify your calibration.
Example of adjustment for emissivity:
Let us say the emissivity is known to be 0.9.
Look up table show emissivity = 0.9 equals Out max = 410.
Other considerations when using IR temperature sensors
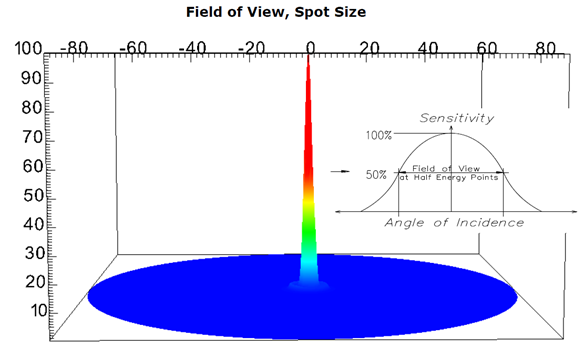
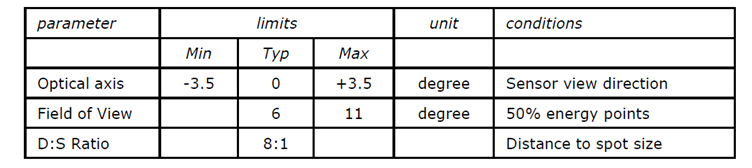
Field of view
The IR sensor lenses have a certain field of view (FOV) that maps where most of the infrared radiation will come from, but also the area just outside might affect the measurement if it is at a very different temperature than the FOV spot.
If you have colder objects in the near field this will pull down the measured temperature, compensate by using a slightly lower emissivity factor.
If you have warmer objects in the near field this will pull up the measured temperature, compensate by using a slightly higher emissivity factor.
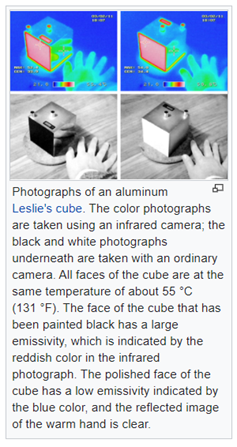
Reflections
Surfaces with low emissivity will reflect incoming infrared radiation and add to the measurement. Typical shiny surfaces like paint and clean metal will have low emissivity and reflect more from other sources, just like a mirror.
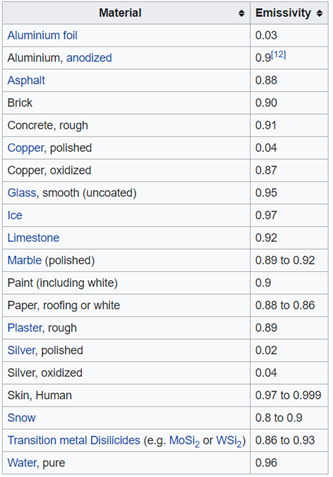
Emissivity table example
from Wikipedia
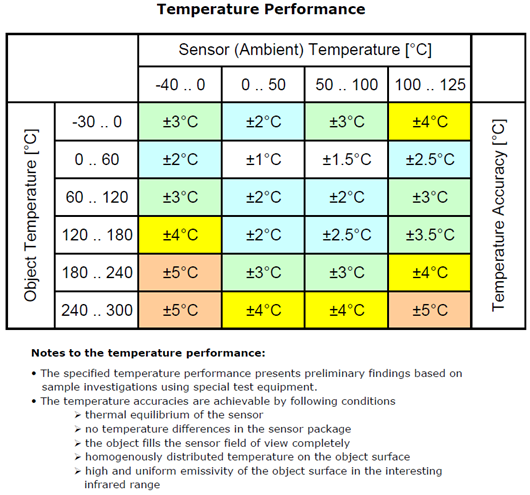
Accuracy table
The sensor reading accuracy is temperature dependent from both sensor and target.
For best accuracy the calibration against known object is recommended.
NB! The IR sensor must not be subjected to ambient temperature above 85°C.